This guide is a revised copy of pdf guide included in Spark (Help > User guide) till Spark 2.7.5. Since 2.7.6 the link in Spark will point to this wiki document instead. This way it will be easier to maintain and update the guide. Also old pdf guide became very obsolete.
Note: Spark offers several special features not described in this short guide (like Fastpath and additional plugins).
Getting started
-
Start Spark.
-
Enter your login information, then click Login.
If your server supports it, you can create a new account by clicking Accounts button and entering the information for your new account.
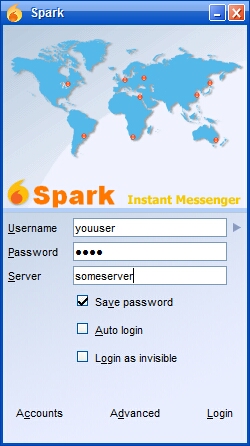
Note: as of 2.8.1 version Server field has been renamed to Domain.
Main window

Main window (also called Roster or Contacts window) shows a menu on top, which allows to access Preferences, edit your profile and do various actions like adding contacts, customizing view. Bookmarks menu will also show up in there when a user will add bookmarks. Below the menu Spark shows an avatar selected by a user, his name and his current status. In the middle there is a section showing user’s contacts. Green bubble represent Online users (gray are for Offline users, Away users are yellow and DND are red). At the bottom of the window there is a search field to find new contacts (not to search among the already added ones). A little lock icon shows if your Spark is logged in using a secure encrypted connection (lock means SSL\TLS).
Filling out your profile
You can fill out your personal information (Name, Occupation, Phone numbers) by going into menu File and selecting Edit my profile… entry. You can also set your avatar there in the Avatar tab.
Adding contacts
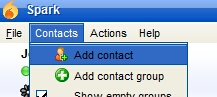
- Select Contacts menu and the Add contact item.
-
Enter your contact’s information. In the Add Contact dialog, enter the contact’s username. This will look like an email address. That’s how XMPP user names work.
-
Select or enter the name of the group you want to add the contact to, then click Add.
If you decide you’d rather have a contact in another group, simply right-click their name, point to Move to, then click the name of the group you want to move them to. You can create groups in the same manner. Note that in some setups shared groups may be set by a server’s administrator so contacts are populated automatically and a user doesn’t have to add them manually (usually in a corporate environment).
Changing your status
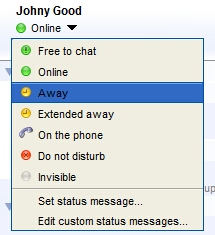
To change your status press the expand icon near the Online status just below your name and select one available or create and apply a custom one. Note that in some cases your status will change automatically (e.g. Away after a set time of being idle).
Sending messages

Spark is using tabs to present separate one to one chats or group chats. In the top left corner of a window you can see your contact’s avatar (if he has set one), name, occupation, email address. On the right there is a toolbar letting you check contact’s profile, start a group chat automatically inviting that user, send files, send screenshot, view complete chat history. This toolbar can also show additional buttons enabled by plugins. Like OTR button in the above example. In the middle of a window you can see the old (before the line) and current history. Usually it shows 20 last messages, but this can be disabled in the Preferences. At the bottom there is a field to put your message in (pressing Enter will send your message). Above the input field there is an emoticon picker, spellchecker button and a ‘buzz’ (or ‘nudge’) button, which allows to draw an attention of your contact by shaking his/her window. On the right there is a little button with a red cross, which allows setting the chat window to show always on top of other windows.
Sending broadcast messages
You can broadcast a message to everyone on your contact list by going into menu Actions and selecting the Broadcast message option. In there you can select whole Roster, individual users or groups, enter you message and send it to selected users. Alternatively you can select a subset of people you want to broadcast to by holding the CTRL key and clicking on their names in the contacts list (on the Macintosh, hold the Command key), then right-clicking and selecting Send broadcast to selected users… You can also right-click the group’s name and select Broadcast message to group.
Sending files
Files can be sent from the chat window by using the Send file button on the toolbar or just dragging files into a chat window. One can also right-click a contact in the list and select Send a file option. When a user gets a request to receive a file, he has to accept it. After the file has been received a user can press Open or Open folder to access that file.
Using group conferences
Using group chat can be an alternative to scheduling a meeting. To start a group chat click the Actions menu, then click Start a conference option. You can set a name for a temporary group chat room, select users to invite and start a conference. To join an existing room go to Actions menu and select the Join conference room entry. In the room browser you will be able to browse existing rooms, bookmark and join them.
Tip: You can also start a conference by selecting the names of people in your contact list, right-clicking one of them, then clicking Start a conference.
Using Voice Chat
Disclaimer: Voice Chat functionality has been broken since the 2.6.0 versions. In 2.7.6 an experimental version of rewritten voice chat module has been added, but it still needs testing and may have problems. This section of the guide will be updated once the functionality is in usable state.
Useful tips
Press Ctrl+F (while in the contacts or chat window) and start filling the name. It will automatically filter out from all of your contacts. This is a fast way to find a contact in a huge roster.
Press Ctrl+T (only works in a roster window) - it will show frequent contacts, the people you chat most with.
Press Ctrl+E (only works in a roster window) - it will show a list of users you had conversations with recently. A quick way to find whom you were talking with recently, if you can’t remember the name.
Pressing Ctrl+Space after you enter a few characters of someone’s name in the group chat will complete the name automatically.
If a contact you want to talk to is Away (or even Offline) and you want to know right away when he is available. Right-click such contact and select Alert when user is available. Spark will open a chat windows with that contact once he gets Online. Note: Spark will remember this task only until it is turned off.
SSL certificates
If a server you are connecting to is using self-signed SSL certificates, you should go to Advanced menu on Logon screen and enable Accept all certificates option (in 2.9.0 version you can go to Certificates tab and enable only Self-signed certificates). Since 2.9.0 version Spark should show a dialog allowing a user to accept a new certificate when logging in for a first time.